How to Securely Get Plant Data into an Azure Database Via a Site-to-Site VPN.
Data that is generated and resides in the plant can be extremely useful for the continued success of the company, but it often resides in a highly protected and regulated environment. Rather than pushing the information to a database on the enterprise network, many people are moving toward cloud-based data processing and analytics for greater accessibility and expandability. So how can we get the data out of that environment securely and allow the business to start further increasing the value of that data?
Not to worry: this technical tutorial provides step-by-step instructions to guide you through the process. First, you must analyze your current network infrastructure. A typical plant network is segmented from the Internet and the enterprise network. In best practice scenarios, there is often segmentation within the plant network to further reduce the attack surface. Below is a diagram with a best practice plant network design:
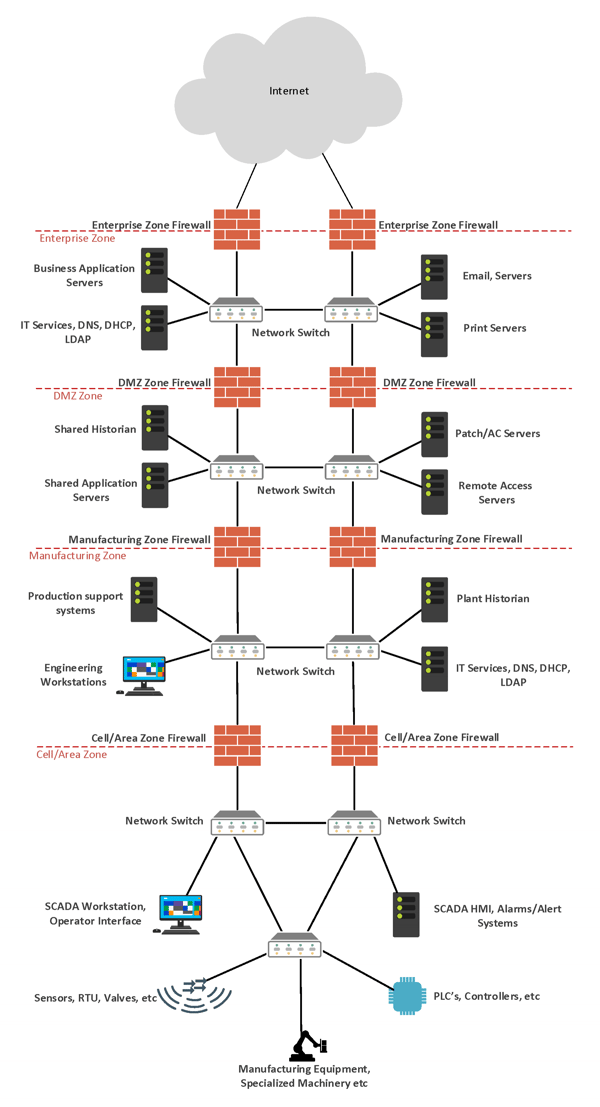
This diagram is our base of reference for the rest of the blog post. (For the purposes of this blog, the Shared Historian Server located in the DMZ Zone is a standard Microsoft SQL Server, and the Enterprise Zone Firewall and DMZ Zone Firewall are Cisco ASA firewalls.) To get data from the Plant to Azure, we need to work in the DMZ Zone, Enterprise Zone, and Microsoft Azure Cloud Database.
Analyzing the Data Flow Path
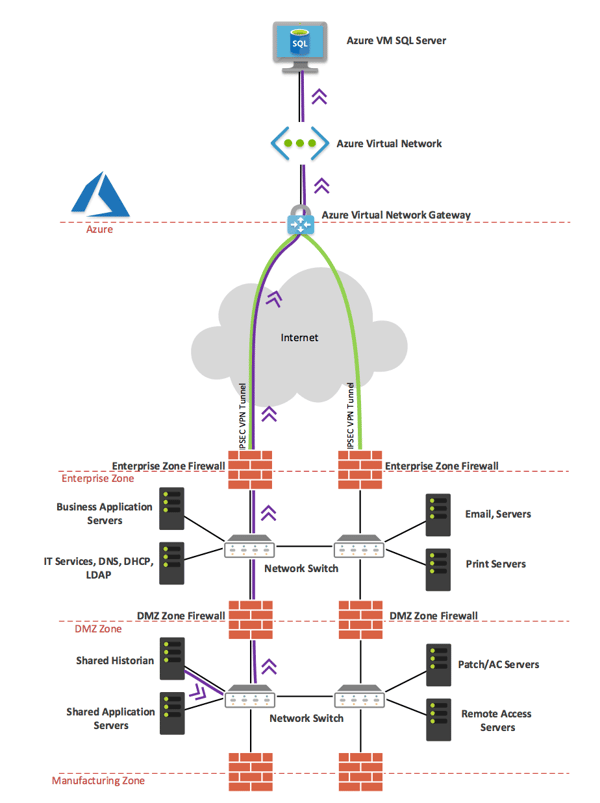
First, conduct a thorough review of your network infrastructure and determine what data is in scope to traverse to Azure. Then let’s define our data flow path to figure out which devices will have to be configured to allow the traffic to flow to Azure. The diagram below shows the desired data flow, and this gives us a list of devices we must configure to allow the data through:
1. DMZ Zone Firewall
2. Enterprise Zone Firewall
3. Azure Virtual Network
Now that we have an idea of which devices have to be configured, let’s start by preparing our Azure environment. This article assumes that you already have some of the Azure basics down and that your Azure virtual network is already in place. If you need more information, check out Microsoft’s official Getting Started guide for Azure.
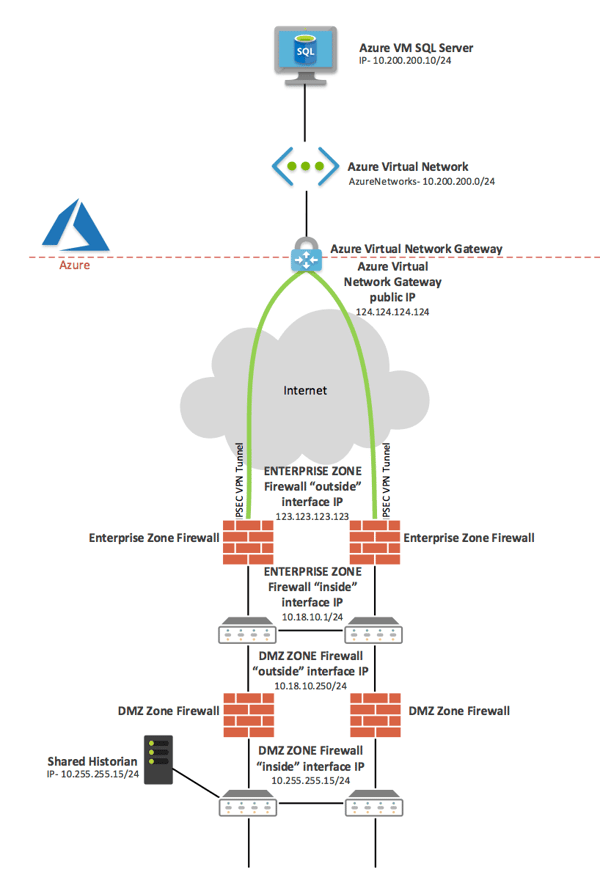
Before we get started, let’s review our network topology with the IP addresses shown:
Configuring Azure Site to Site Virtual Network VPN
1. Assuming you already have a virtual network created in Azure, navigate to your Virtual network > Subnets and select “Gateway Subnet.” The name will be pre-populated, and you can choose your address range. It is recommended that you use a /27 or /28 subnet.
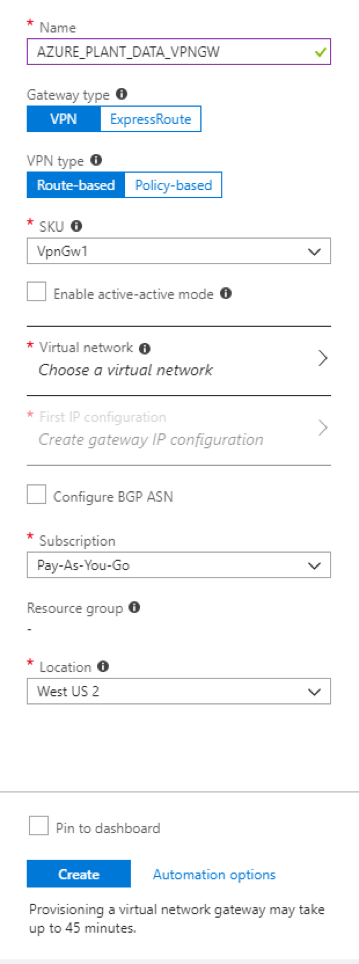
- Your name
- Set the Gateway type as “VPN”
- Set the VPN type as “Route-based”
- Your virtual network
- Select “First IP configuration”
- Create a new Public IP Address
- Verify the remaining settings and click “Create”
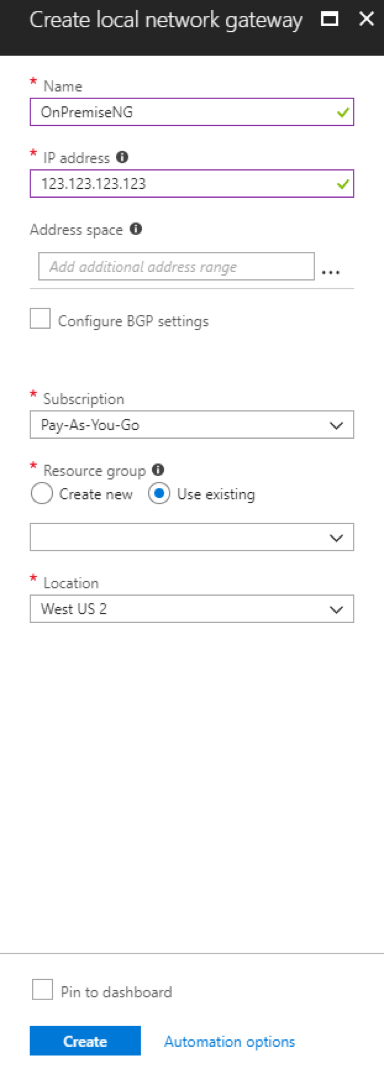
3. Next, we need to create a Local network gateway. This will represent your local network. Complete the following:
- Name the site
- Enter the public IP address of your local site’s VPN device
- Add your local address space – this is your Enterprise Zone or Enterprise LAN address space, and depending on your network architecture, you may need to add the Plant DMZ subnet as well
- Verify the remaining settings and click “Create”
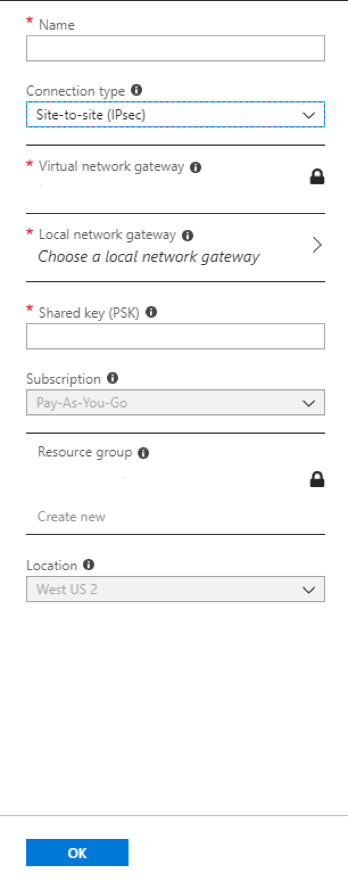
4. Now create the VPN connection. Choose your newly created Virtual network gateway > Connections and select the “Add” button. Complete the following:
- Name the connection
- Set the Connection type as “Site-to-site (IPSec)”
- Virtual network gateway will be pre-populated
- Choose your newly created local network gateway
- Enter a strong PSK (we recommend 20 random characters for high security)
- Verify the remaining settings and click “OK”

5. Finally, it’s time to configure your local VPN device. We will show you configuration of a Cisco ASA firewall, but you can find your specific device compatibility documentation and device configuration guides here. Azure also offers pre-compiled configuration templates for some vendors. To check if there is one for your local VPN device, open the newly created connection and click “Download configuration.” A window will appear and ask for your specific local VPN device details.
On our Enterprise Zone ASA firewall, we added the following configuration to build the VPN Connection:
access-list outside_access_in extended permit ip host 124.124.124.124 host 123.123.123.123
exit
Object-group network AzureNetworks
description Azure virtual network prefixes
network-object 10.200.200.0 255.255.255.0
exit
object-group network OnpremisesNetwork
description On-Premises network prefixes
network-object 10.18.10.0 255.255.255.0
exit
access-list AzureNetworks-ACL extended permit ip object-group OnpremisesNetwork object-group AzureNetworks
exit
nat (inside,outside) source static OnpremisesNetwork OnpremisesNetwork destination static AzureNetworks AzureNetworks
exit
group-policy DfltGrpPolicy attributes
vpn-tunnel-protocol ikev1 ikev2
exit
crypto isakmp identity address
crypto ikev2 enable outside
exit
crypto ikev2 policy 10
encryption aes-256
integrity sha384
prf sha384
group 24
lifetime seconds 86400
exit
tunnel-group 124.124.124.124 type ipsec-l2l
tunnel-group 124.124.124.124 ipsec-attributes
ikev2 remote-authentication pre-shared-key <Pre_Shared_Key>
ikev2 local-authentication pre-shared-key <Pre_Shared_Key>
exit
crypto ipsec ikev2 ipsec-proposal AES-256
protocol esp encryption aes-256
protocol esp integrity sha-1
exit
crypto map AzureNetworks-map 1 match address AzureNetworks-ACL
crypto map AzureNetworks-map 1 set pfs group24
crypto map AzureNetworks-map 1 set peer 124.124.124.124
crypto map AzureNetworks-map 1 set ikev2 ipsec-proposal AES-256
crypto map AzureNetworks-map 1 set security-association lifetime seconds 7200
crypto map AzureNetworks-map interface outside
exit
sysopt connection tcpmss 1350
sysopt connection preserve-vpn-flows
exit
Configuring the DMZ Zone Firewall
1.On our DMZ Zone Firewall, we included the following configuration, which adds a static NAT for our Shared Historian server and allows the SQL communication:
Object network Shared_Historian
Host 10.255.255.15
Nat (inside,outside) static 10.18.10.251
Object network AZURE_SQL_VM
Host 10.200.200.10
exit
Object-group service MS_SQL tcp-udp
Description Microsoft SQL Server
Port-object eq 1433
exit
access-list inside_access_in remark Allow MS_SQL
access-list inside_access_in extended permit object-group TCPUDP object Shared_Historian object AZURE_SQL_VM object-group MS_SQL
exit
Creating the Azure SQL Database
1. Azure allows for quick spin-up of a virtual machine (VM) with SQL Server Pre-installed. Select “Add” and type SQL. Then select SQL Server on Windows Server (or whichever option you prefer). Complete the following:
- Name your SQL Server
- Choose the VM Disk type, enter a management username and password, and verify the Subscription and Resource group and location
- Choose the VM size based upon your requirements
- Choose the proper additional settings based upon you design
- Configure SQL connectivity to allow from Public (Internet)
- Verify default port 1433
- Enable SQL Authentication and enter a username and password
- Verify remaining settings and click “OK”
- Validation will run then click “Create”
2. For more information on configuring SQL Replication between the Shared Historian and the Azure SQL VM, read Microsoft’s SQL Server Replication article.
3. If your connection module supports it, enable SSL encryption for the communication between onsite “Shared Historian” and Azure SQL VM.
Securing the Azure SQL VM
1. After your Azure SQL VM is created, navigate to all resources and find the newly created Network security group (NSG) for the Azure SQL VM.
- Add both an inbound and outbound security rule for communication between the Azure SQL VM and the local Shared Historian.
- Verify there is a rule in place to allow Remote Desktop (RDP). It is advisable to change the rule to allow RDP only from an Enterprise subnet.
- Remove any other default “allow inbound or outbound” security rules.
Implementing Safe and Secure Cloud Data
Cloud-based solutions for manufacturing and industrial systems have a lot of attractive benefits because they allow hard-to-access plant data to be easily accessible by multiple users and audiences. The key takeaway is to apply proper security measures to protect the data as it traverses from the plant to the cloud. If you need help implementing or evaluating a cloud-based solution for your application, contact us today for a free consultation with one of our experienced networking engineers.
Or to learn more about the benefits, concerns, and practical use cases for cloud computing in the industrial world, read out white paper Demystifying the Cloud for Manufacturing.


COMMENTS